July 2026 Snapshot
This month's Snapshot is filled to the brim with
exciting news and updates.

What's New?
Two New Design Elements: Worth the Wait
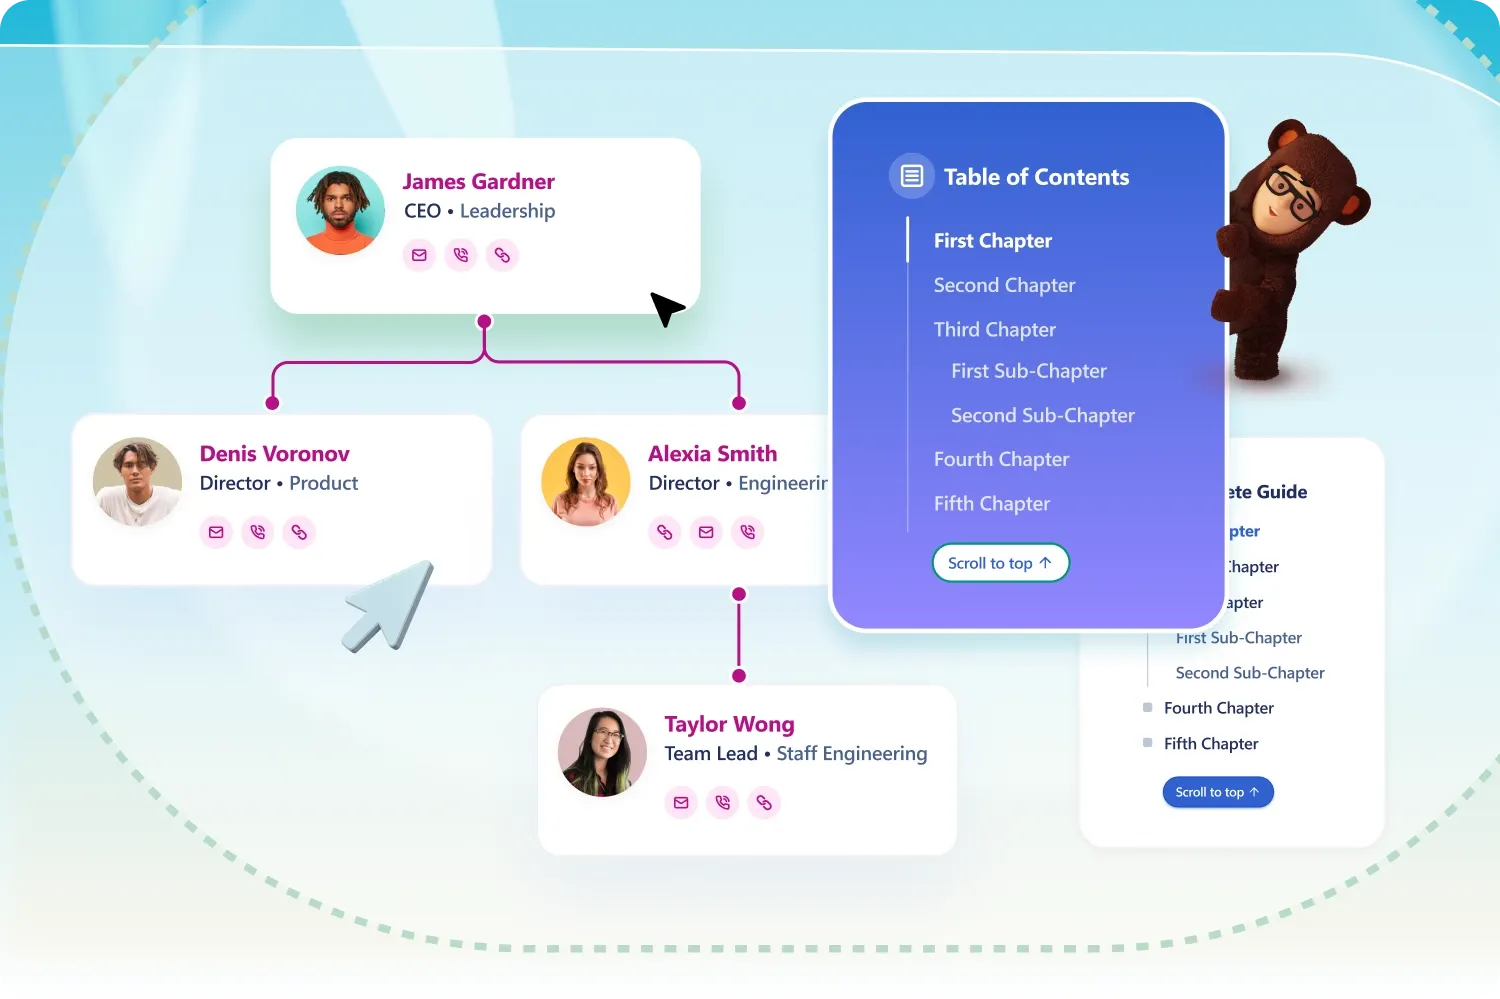
This month brings two new Design Elements to the ShortPoint library, both aimed at making big, busy intranets easier to navigate. One of them has been sitting at the top of your request list for a long time.
The Organization Chart, one of your most-requested elements
You asked, we built it. The new Organization Chart Design Element lets you create polished, engaging employee directories that show your company's reporting structure at a glance. Add a card for each person with their photo, name, role, department, and contact details, and the manager's email field quietly does the clever part: it maps everyone into the right branches so the hierarchy draws itself correctly. Pick from two styles, a classic horizontal layout or a more formal top-down vertical one, and tune the colors and light or dark mode to match your brand.
Prefer a chart that keeps itself current? You can make it dynamic with ShortPoint Connect. Go to the Connect tab and link it to your company directory (Microsoft Entra ID). From there, it pulls employee names, titles, departments, and reporting lines automatically, and refreshes whenever your directory changes, no manual editing required. (The dynamic setup needs a Pro or Enterprise license and the Graph API connection enabled.) The element itself is available from ShortPoint version 9.2.0.0.
A table of contents that writes itself
Long, text-heavy pages finally get the map they've been missing. The new Table of Contents Design Element automatically reads the headings on your page and turns them into a clickable navigation panel; click any item and the page glides straight to that section. Choose from three styles, match the colors and sizing to your brand, switch between light and dark mode, and switch on extras like collapsible sections and a "scroll to top" button for the really long pages.
It's built for exactly the pages that tend to sprawl: onboarding hubs, policy and compliance manuals, product documentation, and quarterly town hall recaps, anywhere a wall of text needs signposting. (Also available from ShortPoint version 9.2.0.0.)
Both elements are in the Design Elements library now, ready to drop onto a page. Learn more about the Organization Chart Design Element and the Table of Contents Design Element .

ShortPoint Admin
Meet the ShortPoint Admin: New Controls Over Who Can Do What
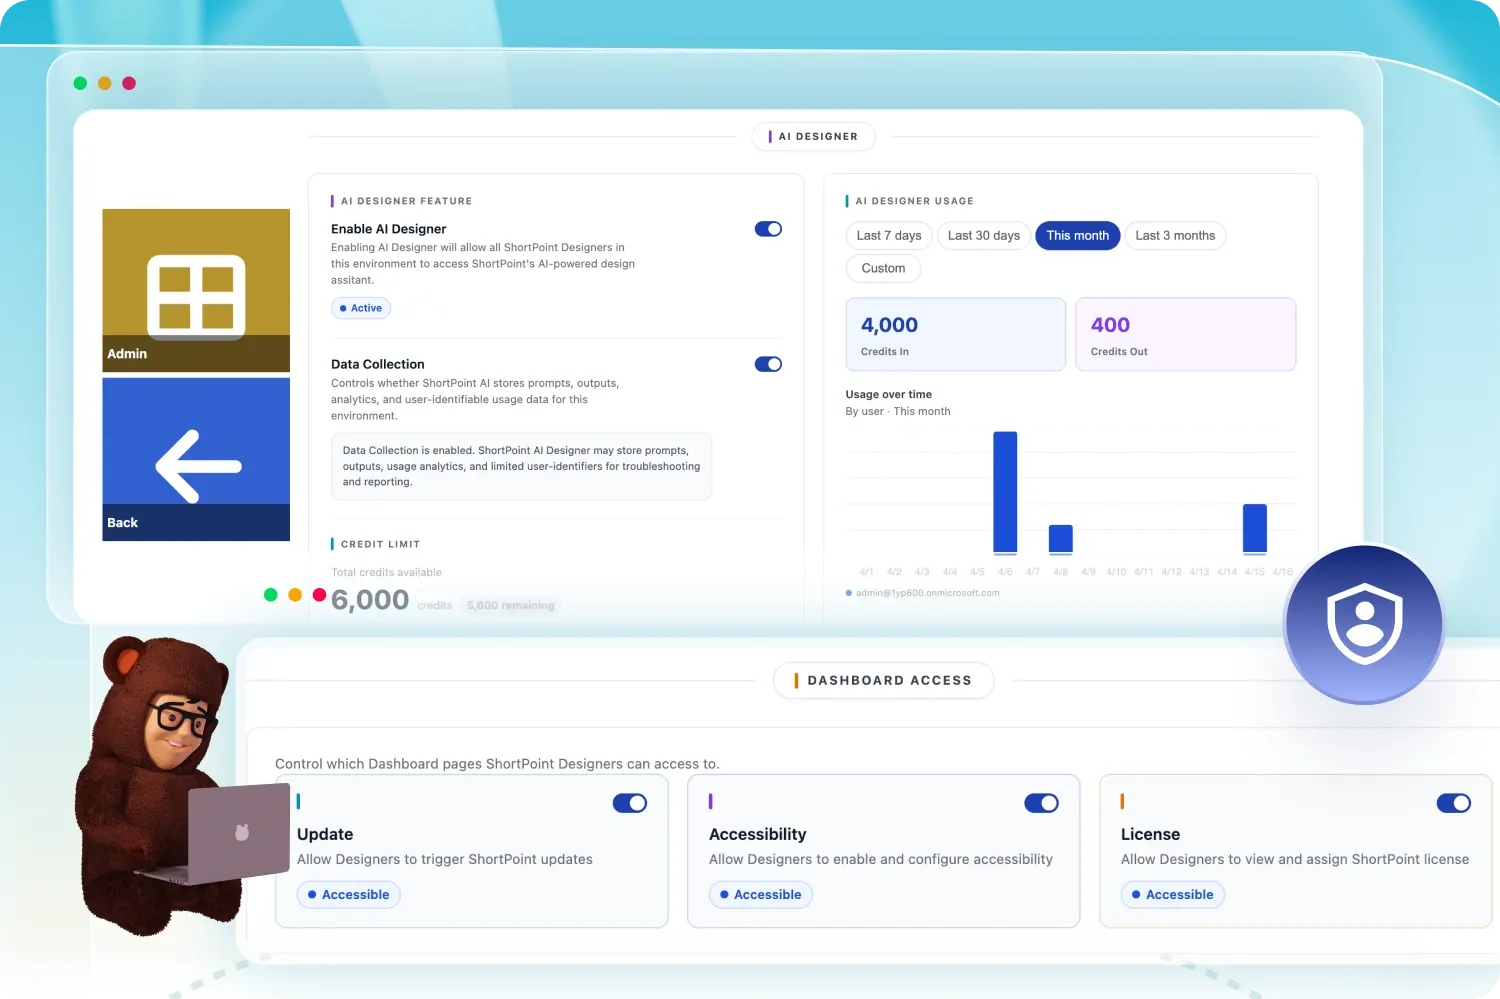
Until now, ShortPoint has had no admin role of its own. Every ShortPoint Designer saw the same Dashboard, and any of them could push a version update or assign licenses. The new ShortPoint Admin role, introduced in ShortPoint version 9.0.0.1, changes that: one designated person now controls those high-level settings for the whole team.
A ShortPoint Admin is a designated individual with elevated permissions who decides which parts of the Dashboard everyone else can reach. From the new ShortPoint Admin page, the admin can hide three pages from other designers:
- Update page: control who can trigger ShortPoint version updates, so upgrades happen on your schedule, not by accident.
- License page: control who can view and assign ShortPoint licenses, keeping that decision with the right people.
- Accessibility page: control who can change accessibility settings.
Updates and license assignments used to be available to any designer; now they can sit behind the admin, which is exactly the kind of guardrail IT and compliance teams have been asking for. SharePoint's own permissions still apply throughout: a person has to be a Site Admin with a ShortPoint Designer license before they can edit a page at all. The admin role simply adds a layer of control inside your designer team.
The same role is also the control center for AI Designer. The admin holds a single organization-wide switch to turn AI Designer on or off for everyone, so you decide whether the feature is available across your tenant at all. Right beside it sits the Data Collection setting: leave it on and ShortPoint keeps a history of AI conversations for easy reuse and support; switch it off and prompts aren't stored. It's the same privacy control we covered last month, and it lives here, in the admin's hands.
Most importantly, the Admin page is where AI spending is managed. Every tenant starts with a defined pool of AI credits, and the admin can set a monthly limit, buy more credits, or turn on automatic recharge so your team never gets cut off mid-project. A usage dashboard rounds it out, showing credit balance, usage over time, and top users, so spending never catches anyone by surprise.
Getting to it is quick: click the ShortPoint icon on any SharePoint page, open the ShortPoint Dashboard, and select Admin. If you are the only ShortPoint Designer, you are automatically the admin. If you have multiple designers, you must contact support@shortpoint.com or submit a request to have the role manually assigned to you.
Want the details? Start with Who is the ShortPoint Admin? and ShortPoint Admin Page: What It Is and How to Access It .

Articles
New Articles
- How to Create a Dynamic SharePoint Employee of the Month Section
- How to Add an Employee of the Month in SharePoint Page Using the Microsoft Graph API Connection
- How to Link MS Teams Chat to Person Cards Profile Icons
- How ShortPoint AI Designer Handles Data Privacy and Security
- How to Create a Dynamic FAQ on SharePoint Using ShortPoint Connect
- How to Showcase Documents in SharePoint Using ShortPoint Connect
- How to Create Personalized Quick Links in SharePoint
- Organization Chart Design Element: How to Create an Organizational Chart in SharePoint
- TOC Design Element: How to Add SharePoint Table of Contents

Tech Tip
How To Build A SharePoint Page From A Picture You Love
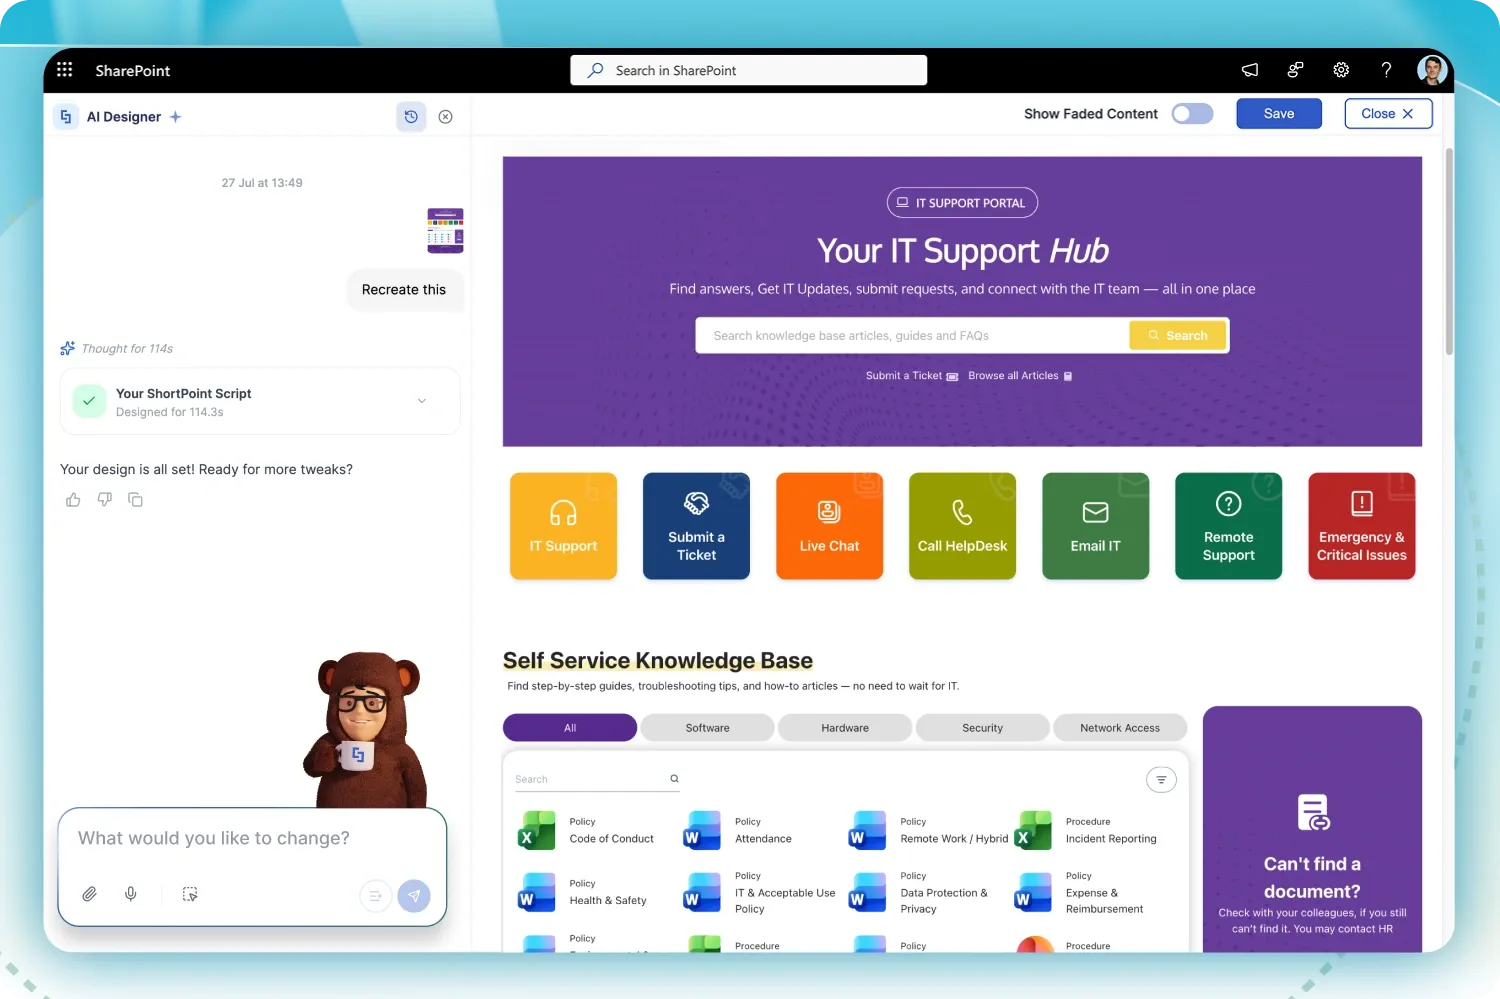
We've all done it, spotted an intranet layout, a slide, or a website section that looks just right and saved a screenshot to "borrow the idea later." Here's the good news. With AI Designer, you don't have to translate that picture into words and hope for the best. You can hand it the image directly and let the AI take it from there.
Before you start: make sure you're on the latest version of ShortPoint with AI Designer enabled and an active Pro or Enterprise license. Not set up yet? You can start a free trial and be building in minutes. You'll also want a reference image ready, a screenshot of a layout you like, a mockup from your design team, or even a photo of a whiteboard sketch. Got one? Let's turn it into a page.
Design from your image in three quick moves: With the AI Designer, you can do image-to-image prompting: instead of describing a design in words, you give AI Designer an existing image as a visual reference, and it builds a new SharePoint page from the cues it reads in that picture, the layout, structure, spacing, and overall look. Here's how to put it to work:
- Attach it or paste it, whichever is faster. Open AI Designer and add your image to the prompt area, either by attaching the file or by copying an image from anywhere and pasting it straight in. That picture becomes the visual starting point for what you're about to build.
- Say what to keep and what to change. The image tells the AI how you want it to look. Pair it with a short prompt that tells it what you want it to say. Try: "Use this layout as inspiration. Build a company news page with a hero story, a three-column update feed, and a quick-links row." AI Designer picks up the visual feel from your image, then fills it with the sections and content you asked for, and automatically applies your brand colors.
- Refine until it's exactly right. The first pass gets you most of the way; the finishing touches are up to you. Reach for Select and Edit to ask the AI to adjust any single element without touching the rest, or open the page in ShortPoint Page Builder to hand-tweak anything that still needs your personal touch, swapping in real content, adjusting spacing, or wiring up a link.
Important: Give it a clean image, and you'll get a cleaner page. This is the part that makes or breaks the result. AI Designer reads visual cues, layout, spacing, and the general look, rather than copying an image pixel for pixel. So the tidier and more focused your reference, the better it translates. Crop to the one section or layout you actually want, avoid busy full-screen grabs with menus and clutter, and use a sharp, legible image. Think of it like briefing a designer: one clear example beats five messy ones.
Note: A reference image guides the design, but your own Theme Builder settings still lead the branding. AI Designer automatically reads your saved colors and typography, so the picture shapes the layout while your brand stays consistent.
Designing from a picture is one of several ways to brief AI Designer, alongside text prompts, voice, and starting from a ready-made template. Pick whichever matches how the idea already lives in your head. Sometimes that's a sentence; sometimes it's a screenshot you can't stop thinking about.
Want to go deeper? See how to work with reference images , and browse the full AI Designer knowledge base for every way to prompt, from voice to the Prompt Library.